Loading...

105 posters, 2 topics, 24 sessions, 264 authors, 71 institutions

ePostersLive by SciGen Technologies S.A. All rights reserved.

2022 ACP Annual Session

2 - 5 November | Austin, TX
2022 ACP Annual Session banner

70

 A novel technique for fabricating direct full-arch tooth supported provisionals 
Part of Topic

Case Presentation

A novel technique for fabricating direct full-arch tooth supported provisionals

V. Villalobos DMD,  J. Thompson DDS, J. Londono DDS 
 Advanced Education Program in Prosthodontics
 The Dental College of Georgia, Augusta University, Augusta GA.

Purpose/Aim 

To describe a novel step-by-step technique that helps dental clinicians fabricate predictable direct full-arch provisionals.

Introduction

Clear matrices used for jet provisional fabrication are typically flimsy resulting in difficulty making predictable chairside provisionals. This issue is avoided by adapting a matrix for provisional fabrication over a diagnostic wax up cast. Before removal of the first matrix from the cast a second, more rigid, matrix is adapted over the first. This double layer is then removed from the cast and trimmed in the traditional manner. The use of this novel matrix technique presents multiple advantages over a single layer technique. The more pliable inner layer more accurately replicates fine detail while the thicker outer layer supports the less rigid layer and prevents it from warping. Additionally, the more rigid outer layer allows for a more secure and predictable seating, ensuring a provisional that resembles the wax up as closely as possible.

 Materials & Methods

1.Full arch wax-up to ideal contours
2.Heavy & Light body PVS
3.Essix ACE Plastic .040 thickness
4.PETG White Thermoforming Plastic .00 thickness
5.Jet Self Curing Tooth AcrylicResin
6.Honeycomb & Cone shaped acrylic trimming burs
 

Step by Step Instructions

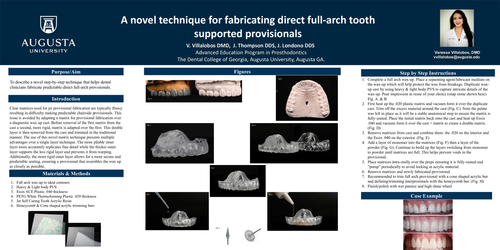
1.Complete a full arch wax-up. Place a separating agent/lubricant medium on the wax-up which will help protect the wax from breakage. Duplicate wax-up cast by using heavy & light body PVS to capture intricate details of the wax-up. Pour impression in stone of your choice (snap stone shown here) Fig. A. & B
2.First heat up the .020 plastic matrix and vacuum form it over the duplicate cast. Trim off the excess material around the cast (Fig. C). Note the palate was left in place as it will be a stable anatomical stop to ensure the matrix is fully-seated.Place the initial matrix back onto the cast and heat up Essix .040 and vacuum form it over the cast + matrix to create a double matrix. (Fig. D) 
3.Remove matrices from cast and combine them: the .020 on the interior and the Essix .040 on the exterior. (Fig. E)
4.Add a layer of monomer into thematrices (Fig. F) then a layer of the powder (Fig. G). Continue to build up the layers switching from monomer to powder until matrices are full. This helps prevent voids in the provisional.
5.Place matrices intra-orally over the preps ensuring it is fully-seated and”pump” periodically to avoid locking in acrylic material.  
6.Remove matrices and newlyfabricated provisional
7.Recommended to trim full archprovisional with a cone shaped acrylic bur and defining/trimming interproximals with the honeycomb bur. (Fig. H)
8.Finish/polish with wet pumice andhigh shine wheel


2022 ACP Annual Session » banner
Copyright © 2015-2026, ePostersLive® SciGen is a registered trademark of SciGen Technologies S.A. Patent pending.

This website and third-party tools we use rely on cookies for the best user experience. By selecting "I agree", you agree to cookie usage as described in our Privacy Policy.